Trade management means deciding what to do with an open position, a trade you currently hold: when to close it, how much to close and when to change its protective stop. The aim is to follow an exit plan while the position's changing profit or loss gives you reasons to interfere.
Plan your exit before opening the trade
Before entering, choose the loss exit, the profit target and any condition for moving the stop. A stop-loss sets the instruction for leaving if price moves against the trade. A take-profit sets the instruction for taking a planned profit. Calculate the position size before entry; managing it afterwards should not turn a small planned loss into a larger one.
Write conditions you can check. “I'll hold while it looks strong” leaves the decision to your mood. “I'll exit at this price level and move the stop only after this specified change on the chart” gives you an instruction to follow. The conditions belong to your trading system.
In my course section on exiting a trade, I connect the stop, target and condition that would invalidate the entry. I use a significant opposite price zone as a target reference. The length of an earlier price move can provide another reference, but the chart's intervening levels still matter. Price does not have to repeat that move. If a nearby obstacle leaves too little room for the planned gain relative to the risk, I skip the entry.
Where to place a take-profit
A take-profit instruction closes all or part of a position when its price condition is met. For a buy, the intended profitable exit is above the entry; for a short, it is below. A short is a position intended to benefit from a fall in price. Brokers often implement a profit target as a limit order, which specifies an acceptable price but may fill only partly or not at all.
I choose a target from price levels rather than a desired cash income. For a buy, resistance is an area where earlier rises met selling. For a short, support is an area where earlier falls met buying. The guide to reading price charts explains how to identify these areas. A level gives a reason for the target; it does not tell you the probability of reaching it. The optional practical discussion of choosing a profit target illustrates this use of levels.
Then compare the planned gain with the planned loss. The course uses a 1:3 risk-to-reward reference: the intended gain is three times the initial loss budget before trading costs. That ratio alone does not establish profitability. Stops may be reached more often than targets, and actual fills and costs change the results. The risk-management guide covers the loss budget and position-size calculation.
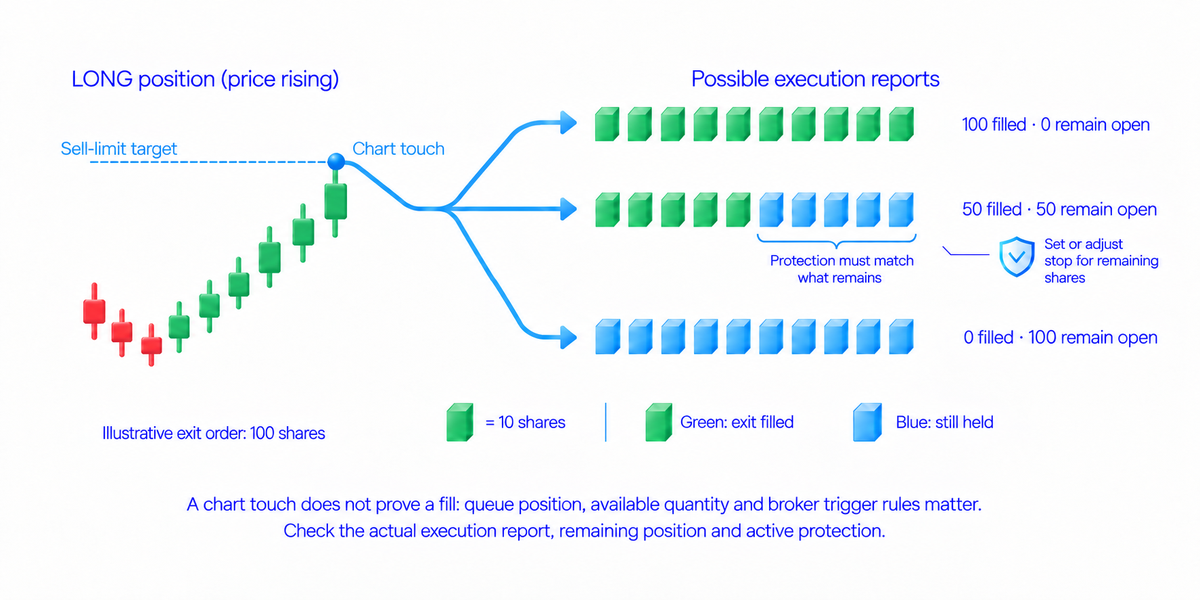
A touch on the chart does not prove that your exit filled. A limit order may be waiting behind other orders or may have filled only some of your quantity. The broker's trigger price may also differ from the price displayed on your chart. Check the rules for your instrument and order; the order-types guide explains these execution differences. After a target is reached, check the actual filled quantity and the remaining position.
When to move a stop to break-even
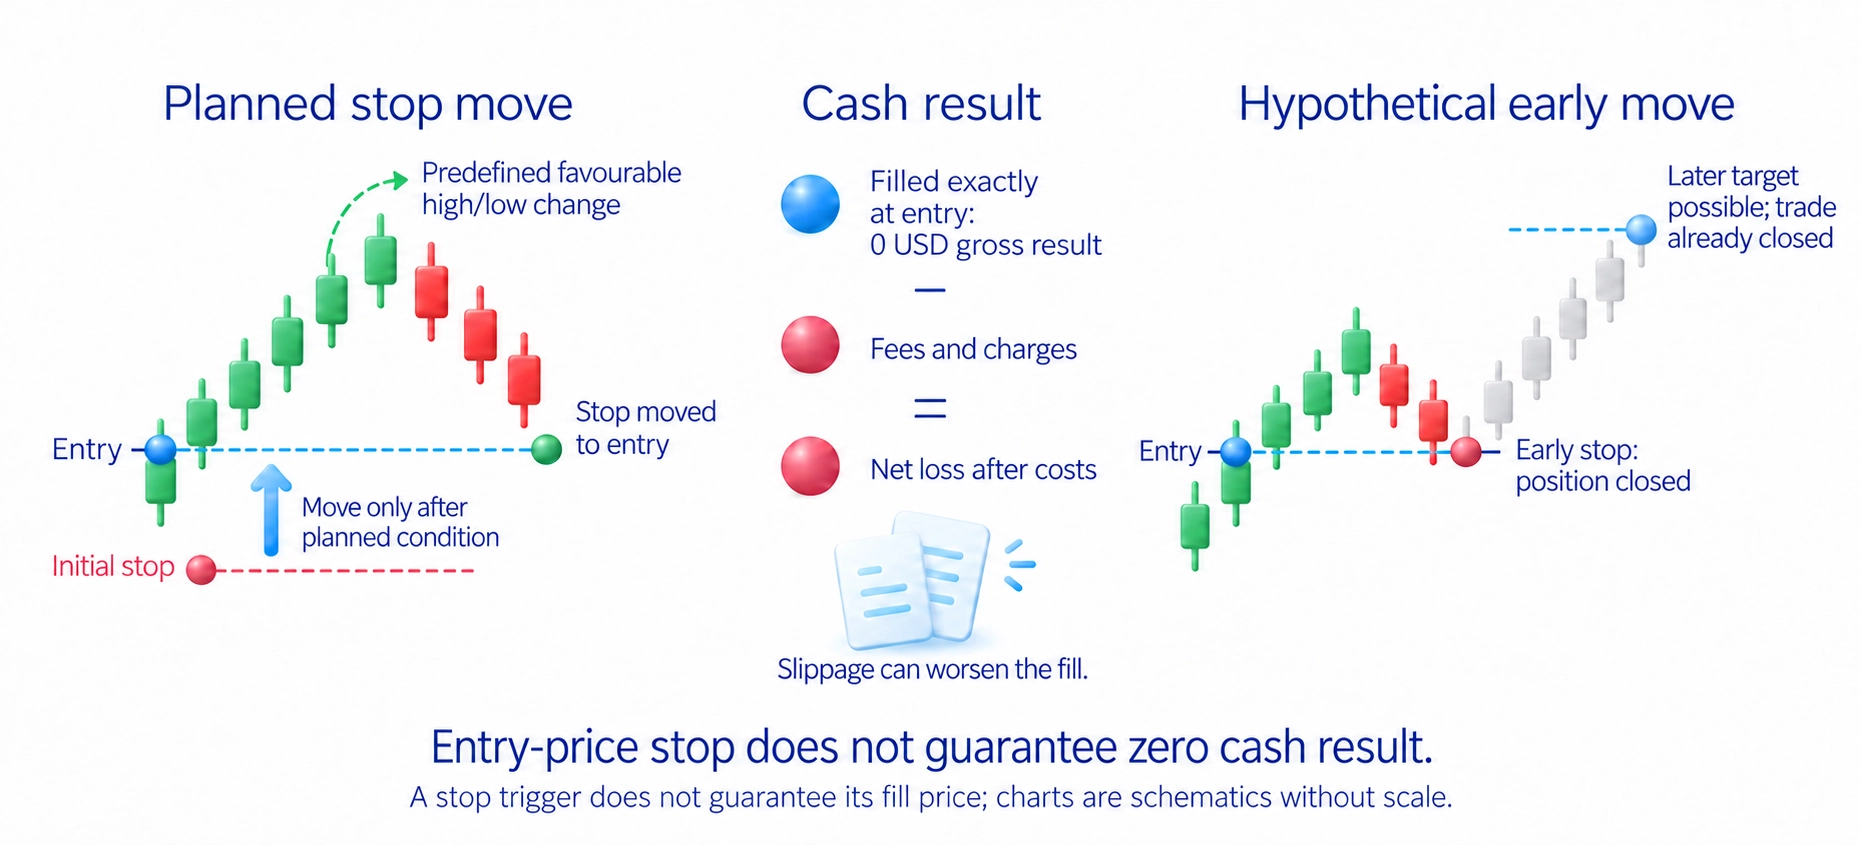
Moving a stop to break-even usually means putting it at the entry price. It reduces the planned loss from an adverse price move but does not guarantee a zero cash result. Commissions, holding charges and slippage can still leave a loss. Slippage means the order fills at a different price from the price expected. Even a fill exactly at entry can leave a small net loss after costs.
In the course, I consider this move after a confirmed change in the chart's highs and lows in favour of the trade, under the system's management rule. The required change must be specified beforehand. A position being profitable for a few seconds is not a substitute for that condition. The wider method for interpreting price structure is explained in the Wyckoff guide.
Moving the stop too soon creates another problem. An ordinary pullback can revisit the entry, close the position and then continue towards the target. This does not mean the stop should never be moved. It means the move needs its planned confirmation. Until that condition occurs, an unrealised profit is not a new exit rule.
What changes when you take partial profits?
A partial exit closes some of the position and leaves the rest open. The closed portion has a realised result, but the outcome of the whole trade still depends on the remaining exit and costs. The remaining position is not automatically risk-free.
Consider one hypothetical share trade, with all fills at the stated prices and no fees or slippage. You buy 100 shares at $100, with an initial stop at $98 and a target at $106. The planned loss is 100 × $2 = $200. Closing all 100 shares at the target would make $600, or three times the initial risk.
Suppose the plan instead closes 50 shares at $104. That portion makes 50 × $4 = $200. If the other 50 shares later close at $106, they make another $300, giving a total of $500 rather than $600. If the remainder closes at the $100 entry, the total stays at $200 before costs. If it closes at the original $98 stop, it loses $100, leaving a total gain of $100: $200 − $100.
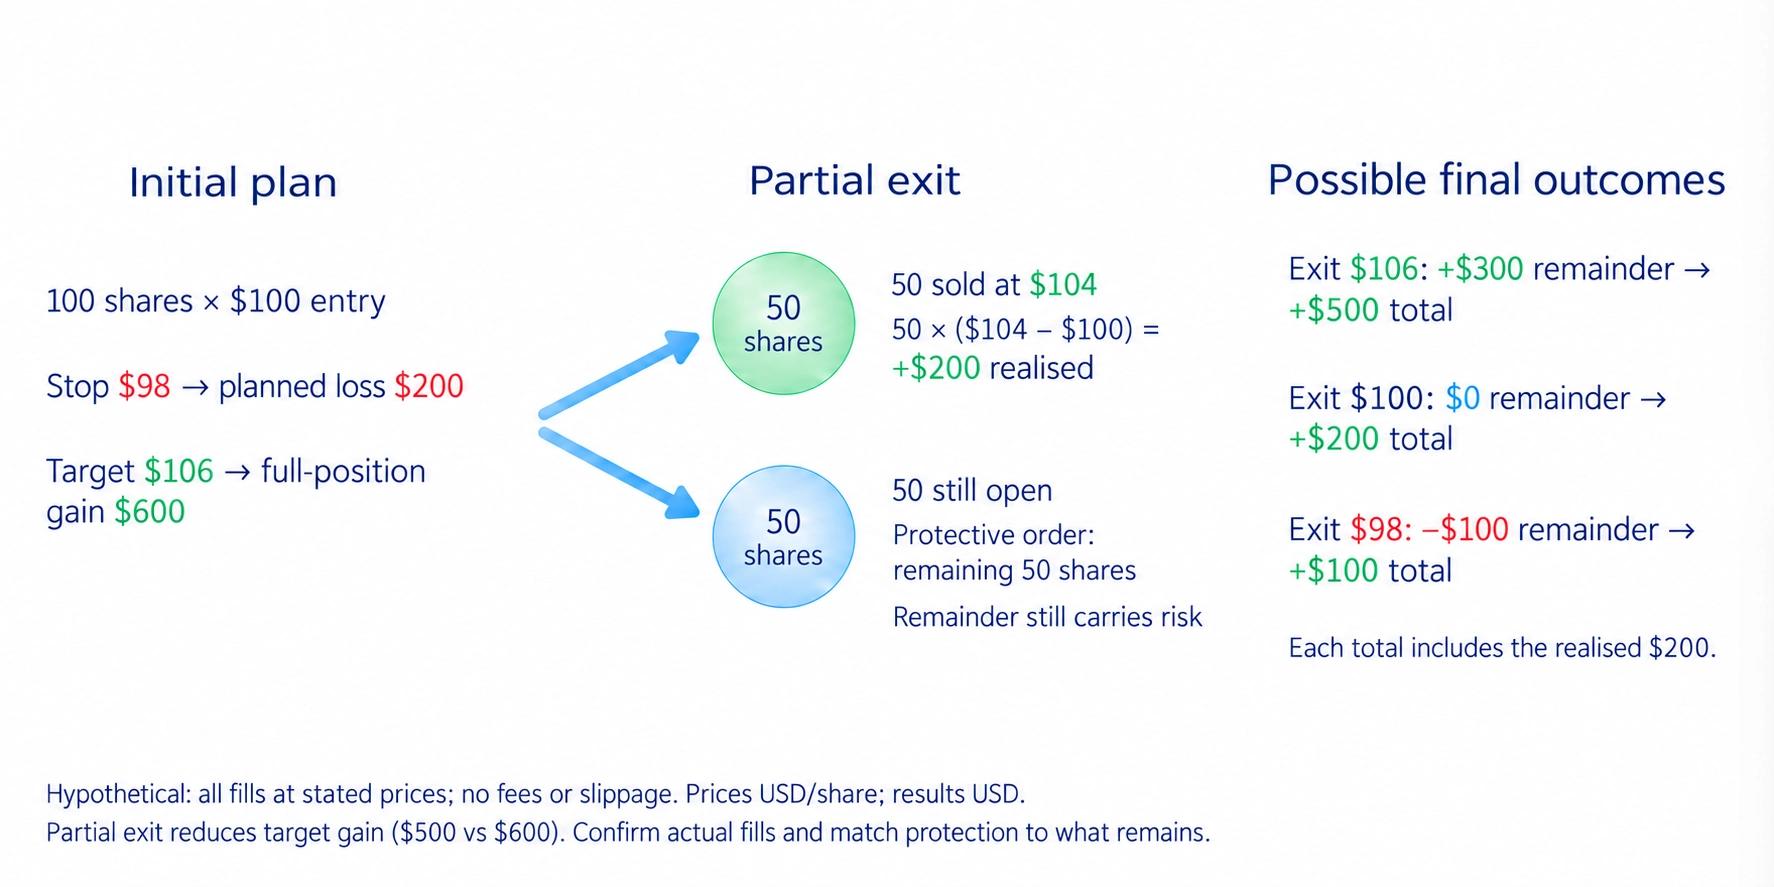
This is the tradeoff: an earlier partial exit secures a result on part of the position but reduces the gain if the later target is reached. Choose the portion to close and the stop rule for the remainder before entry. After a partial fill, reduce the protective order's quantity to match what actually remains, unless the platform adjusts it automatically.
How a trailing stop follows price
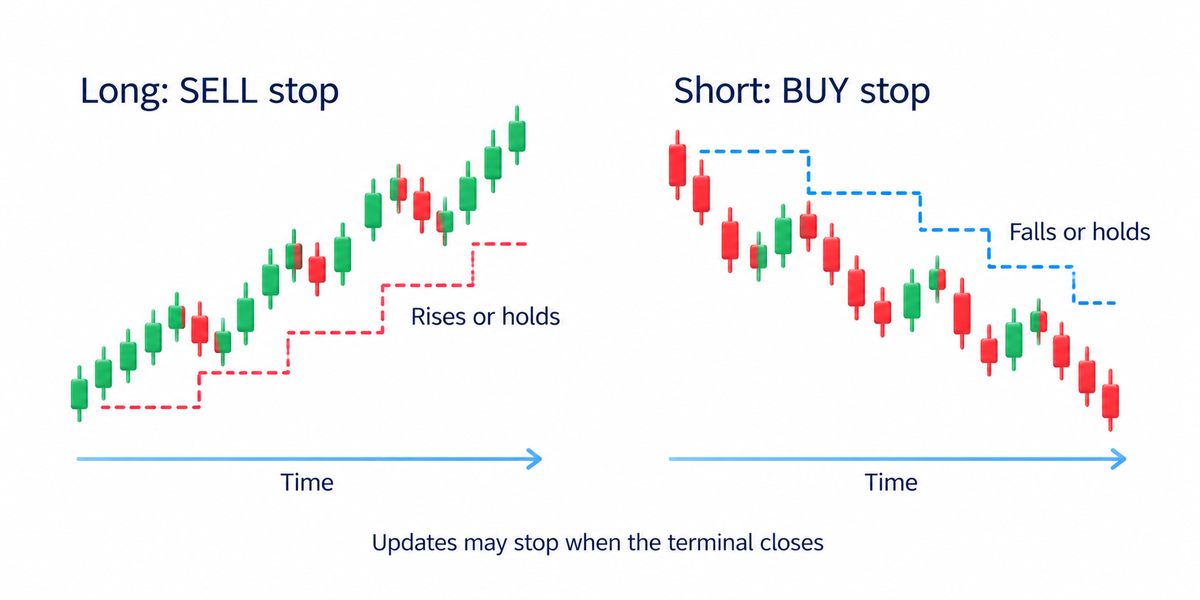
A trailing stop adjusts a protective level as price moves favourably. For a buy, it can rise with price but does not move down merely because price pulls back. For a short, the direction is reversed. This is a separate management option. Adding it changes the exit method; it should not silently replace the course's fixed target and specified condition for moving the stop.
The trailing distance is the gap between the reference price and the stop. Some platforms also have a step, meaning how far price must move before another adjustment occurs. A small distance may close the position on an ordinary pullback. A larger distance allows more movement but also permits more of the open profit to be given back. The ATR indicator can help describe the instrument's usual price range; there is no one trailing distance that suits every market.
Trailing does not guarantee a profitable exit. A buy's stop can still be below entry; a short's can still be above it. A stop-market order also does not guarantee its execution price.
Check where the trailing adjustments run: on the broker's system or in your trading terminal. If they run in the terminal, closing that terminal can stop further adjustments. The last stop already sent to the broker may remain active under the broker's rules.
Check the remaining position after every change
Check three things: the quantity still open, the protective order still active and the condition for the next exit. If the target and stop are separate orders, cancel an unused order after the position is closed. With linked orders, confirm that filling one really cancelled the other. An order left behind can open a new position instead of closing the old one.
Do not move the stop further against the position just to postpone taking a loss. Opening an opposite trade is not necessarily the same as closing the original trade either. In some account arrangements, it leaves two separate positions and adds costs. If you intend to finish the trade, verify that the original position is actually closed.
When fear of losing an open profit makes you want to intervene, compare the proposed action with the written condition. The trading-psychology guide explains the emotional decisions involved. The beginner's trading guide provides the first practice steps. Use a demo account to check partial exits, linked orders and cancellations before using those controls with real money. A successful demo test does not guarantee the same fills in a live market.
Frequently asked questions
It is the set of rules for an open trade: when to close it, how much to leave open and when to change its planned protective exit. Write the conditions before entry and check whether they have occurred.
In Igor Arapov's approach, the planned profit exit comes from price levels and is checked against the planned loss exit. For a buy, an area where earlier rises met selling is a reference; for a trade opened for a fall, an area where earlier declines met buying is a reference. Reaching the target and filling the whole exit order are not guaranteed.
The course considers moving the protective exit to the entry price after a confirmed change in the chart's highs and lows that supports the trade, under a rule specified before entry. Charges and execution at a different price can still leave a cash loss.
An ordinary move back towards the entry can trigger the protective exit before the planned movement develops. Move it when the written condition occurs, rather than as soon as the trade shows a profit.
Compare the gap between the reference price and the moving protective exit with the instrument's normal price movements back against the trade. Check how far price must move before another adjustment, the trigger price and whether updates run at the broker or in your terminal.
If your intention is to finish the trade, check that the original trade is closed. On some platforms, an opposite trade leaves two trades open and adds costs; it is not an exit.
About the author
Igor Arapov, a practising trader since 2013 and the author of the ArapovTrade library. ORCID: 0009-0003-0430-778X.