An order block is a price area marked before a strong directional move in Smart Money Concepts, or SMC. A common rule uses the last opposite-direction candle: a falling candle before an advance or a rising candle before a decline. The area gives you a place to check price on a later return. It is not an entry signal by itself or evidence that a bank still has orders waiting there.
What is an order block?
For a bullish candidate, imagine a strong advance that passes a previously selected high. The last falling candle before that advance is the candidate's starting point. For a bearish candidate, find the last rising candle before a decline through a selected low. Bullish and bearish describe the expected reaction under the scenario, not a result the market must deliver.
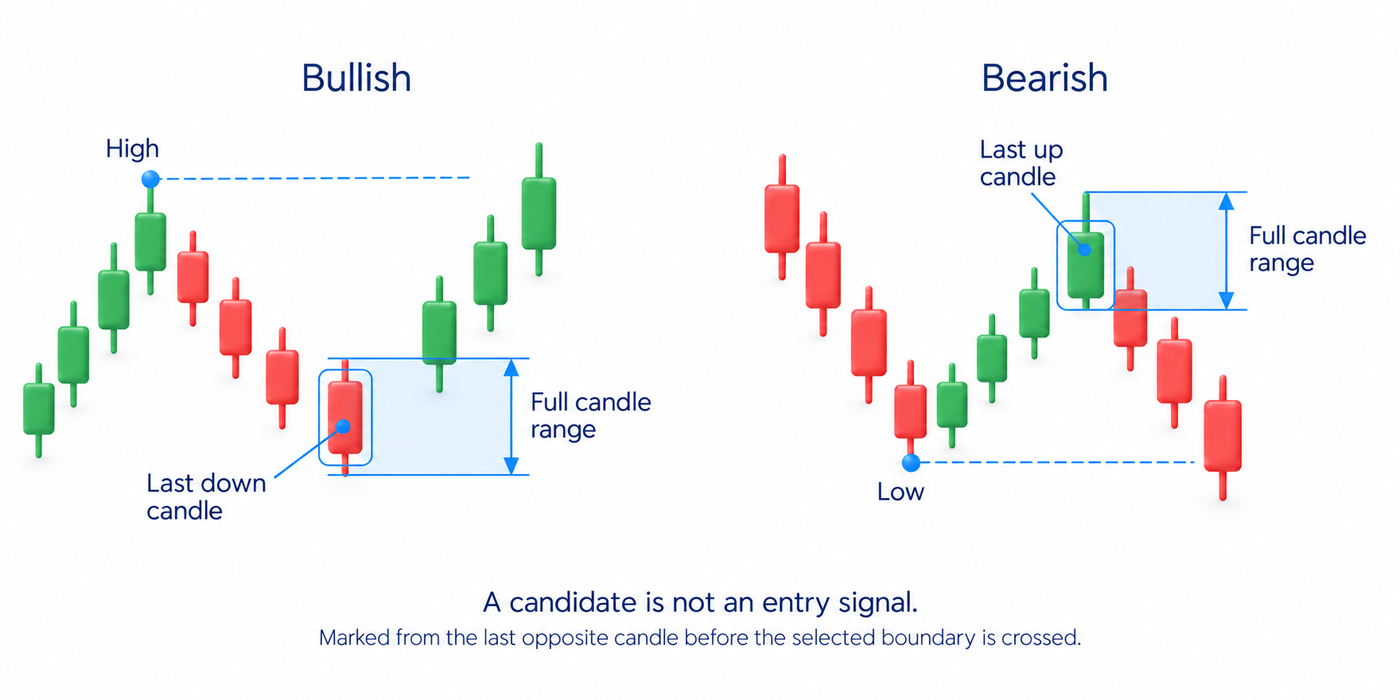
SMC interprets possible large-participant activity through price structure. A normal candle records the period's open, high, low and close; it does not identify the owners of transactions or all instructions still to be executed. Different funds can trade in opposite directions. A visible advance does not disclose who will buy when price revisits the marked area.
A large order can affect price if too little opposite quantity is available nearby. Participants can also split instructions and display only part of an order's size. These mechanisms do not establish that a particular opposing candle contains a large participant's unfilled orders. The market-microstructure guide explains execution and the limits of visible data.
The practical use of a block is to organise an observation. Instead of buying anywhere in an advance, wait for a return to a premarked area and check whether downward progress stops and buying resumes. For a sale, look for the opposite reaction. Without the required reaction, the rectangle has not supplied a reason to enter.
How to mark an order block
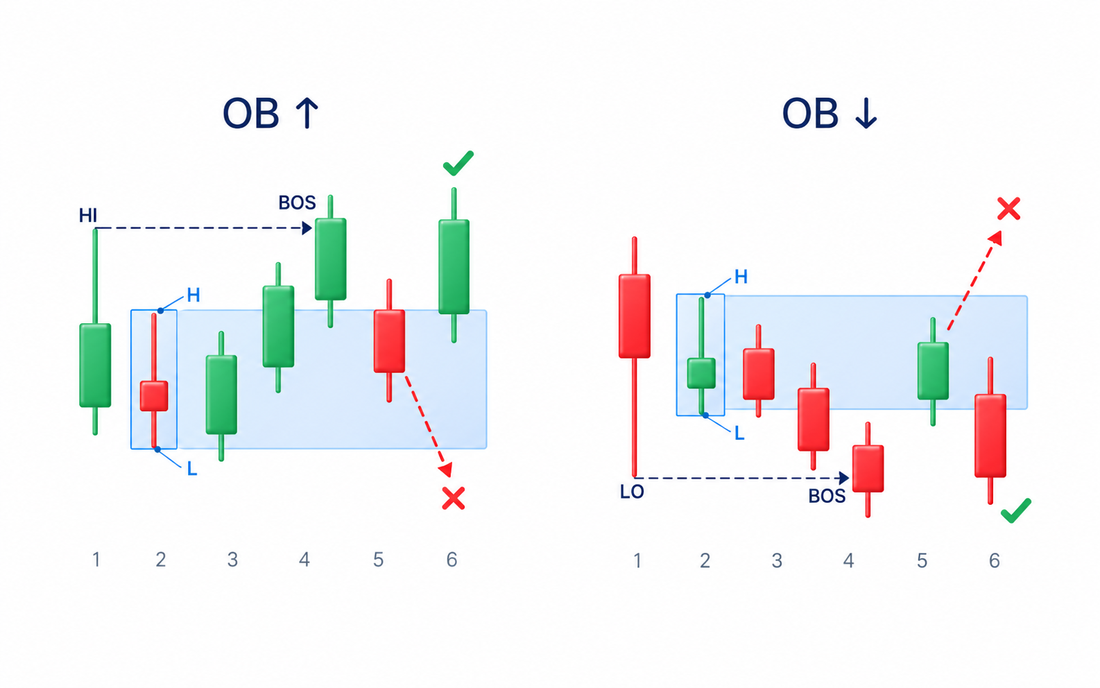
Choose the chart period and meaningful high or low before marking the area. Compare the directional move with neighbouring candles: did it make progress beyond the selected boundary, or merely create a large candle within the old range? Under the rule used here, a bullish candidate needs an advance above that high; a bearish one needs a decline below that low.
Find the last opposite-direction candle before the move. In this article, the candidate's boundaries are that candle's high and low, including its shadows, the portions beyond the body between its opening and closing prices. Other conventions use only the body or several candles forming a base. They produce different areas, so choose a convention before testing rather than switching after a failure.
Not every opposite candle creates a useful candidate. Check the movement that followed and whether it changed the structure of the selected period. A small fluctuation between nearby candles is not the same as leaving a clear range. If almost every candle becomes a block, you no longer have a distinct condition to investigate.
A smaller chart period can show the return in greater detail: an hourly candle contains multiple five-minute candles. That does not automatically strengthen the larger area or reduce the trade's risk. A protective stop is an instruction intended to close a position when its trigger condition is met. More small fluctuations can trigger a tightly placed stop before the wider scenario develops. Keep the original rule for selecting the area while examining the additional detail.
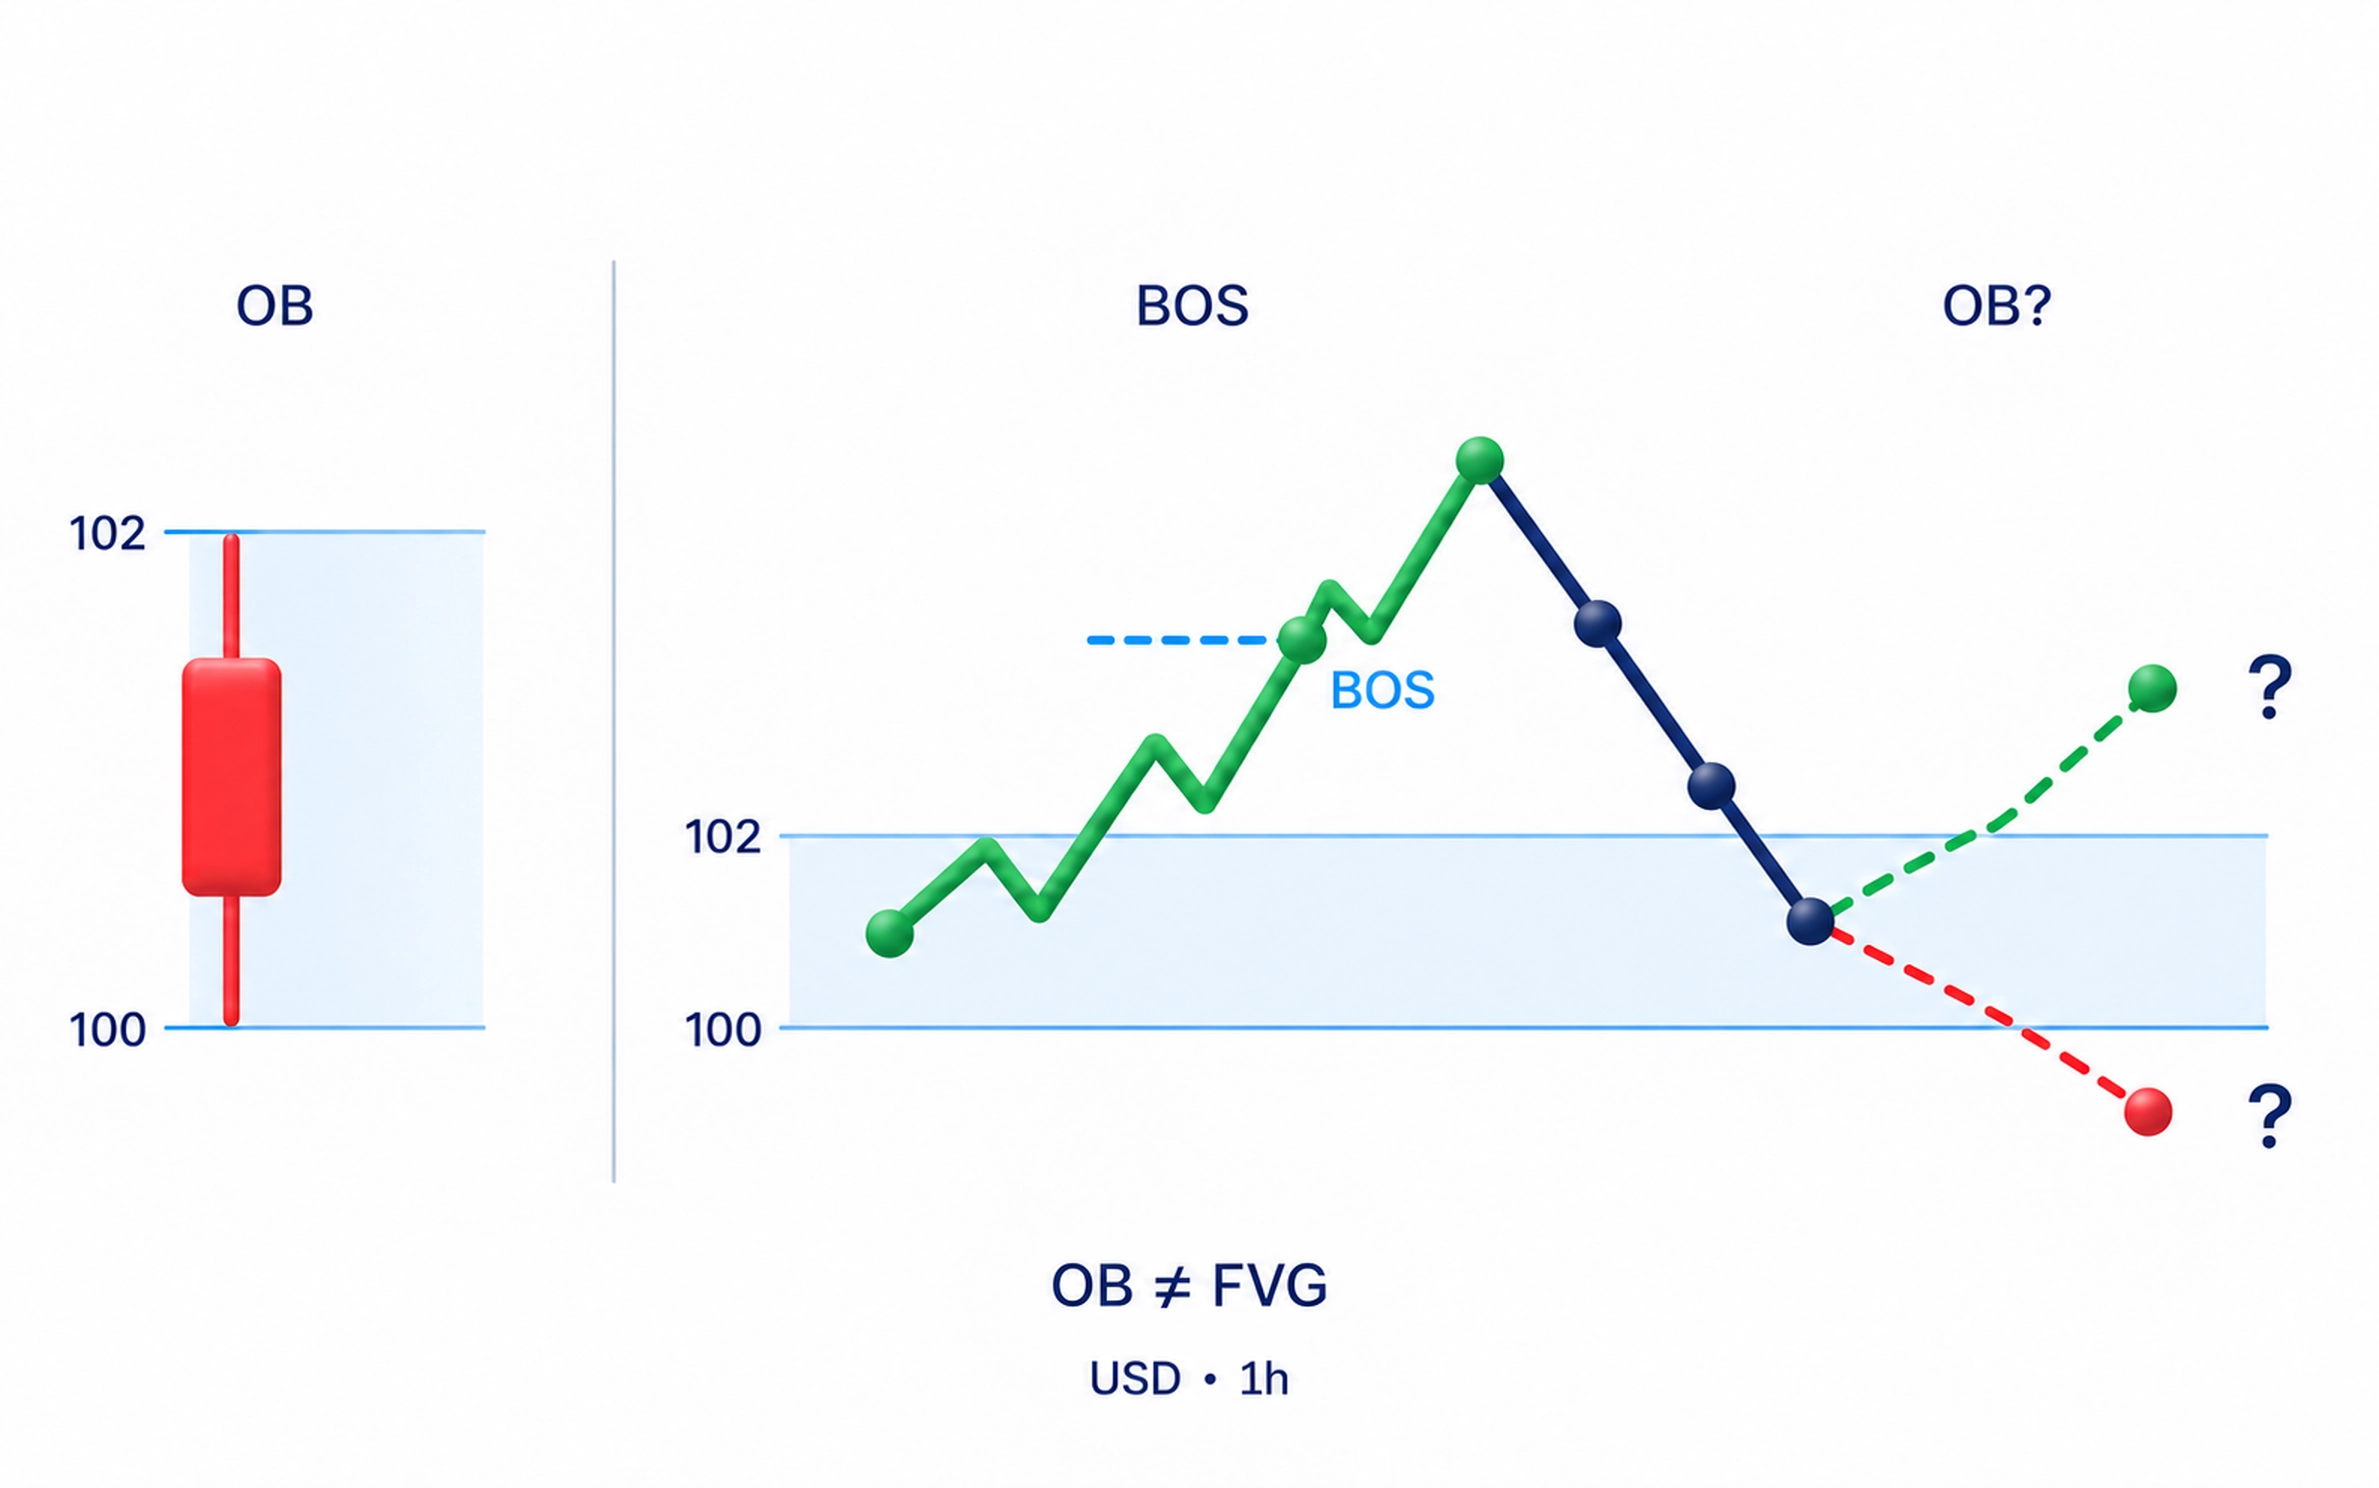
An order block and a Fair Value Gap, or FVG, use different marking rules. The block comes from the selected opposite candle before a move. An FVG comes from a non-overlapping area between the first and third candles in a particular three-candle sequence. They may overlap, but neither requires the other. The imbalance-and-FVG guide explains that construction.
What to check on a return
A return to the area is a test. SMC traders also use mitigation to describe visiting a previously marked block and assessing its reaction. The term does not confirm that a bank covered a loss or all remaining orders were filled. Some methods separately define a mitigation block differently; here mitigation refers to the return to an ordinary order-block candidate.
For a bullish area, check whether the decline stops and upward movement resumes. For a bearish area, check whether the advance stops and selling resumes. One candle's colour is insufficient: a small rising candle can occur during a continued decline. Define the movement away from the area that you need to see, rather than accepting a boundary touch alone.
Trading volume records the quantity exchanged during a period, such as shares or futures contracts. It helps compare activity with progress. During a return to a bullish area, continued trading with little further downward progress and a subsequent advance is worth investigating. It does not identify one large buyer. The volume-analysis guide explains the comparison and the importance of the data source.
The first return lets you assess a previously untested area, but does not guarantee a bounce. A later test is not automatically a failure either. Record how deeply price entered, whether it moved away and what happened between visits. The number of touches does not reveal somebody else's remaining orders.
In my approach, a price area matters together with activity and the next movement. In the course's working-with-levels example, an active upward move is followed by narrower rising bars and a decline through local support. That sequence explains why a first impulse is not enough. Marking the last opposite candle is an SMC convention, not a separate compulsory rule of the course.
My video on the entry point shows a level breaking and then being tested. It is an optional practical addition: the distinction is between a marked location and a prepared entry. The fragment concerns level-based analysis, not a promise to trade every order block.
Example: testing an order-block candidate
Consider a hypothetical stock priced in US dollars, not a recorded author trade. On an hourly chart, price has repeatedly stayed below 105. The last falling candle before a strong advance has a low of 100 and a high of 102. Price then reaches 108. Under our marking rule, 100 to 102 is the bullish candidate because the advance passed the previously selected high at 105.
On the return, price enters the area and stops near 101. Beforehand, the trader chose to wait for movement back above the upper boundary instead of buying at the first touch. A subsequent rise above 102 meets that confirmation condition. It is one possible rule, not a universal entry: waiting provides the observed exit from the area but changes the entry price.
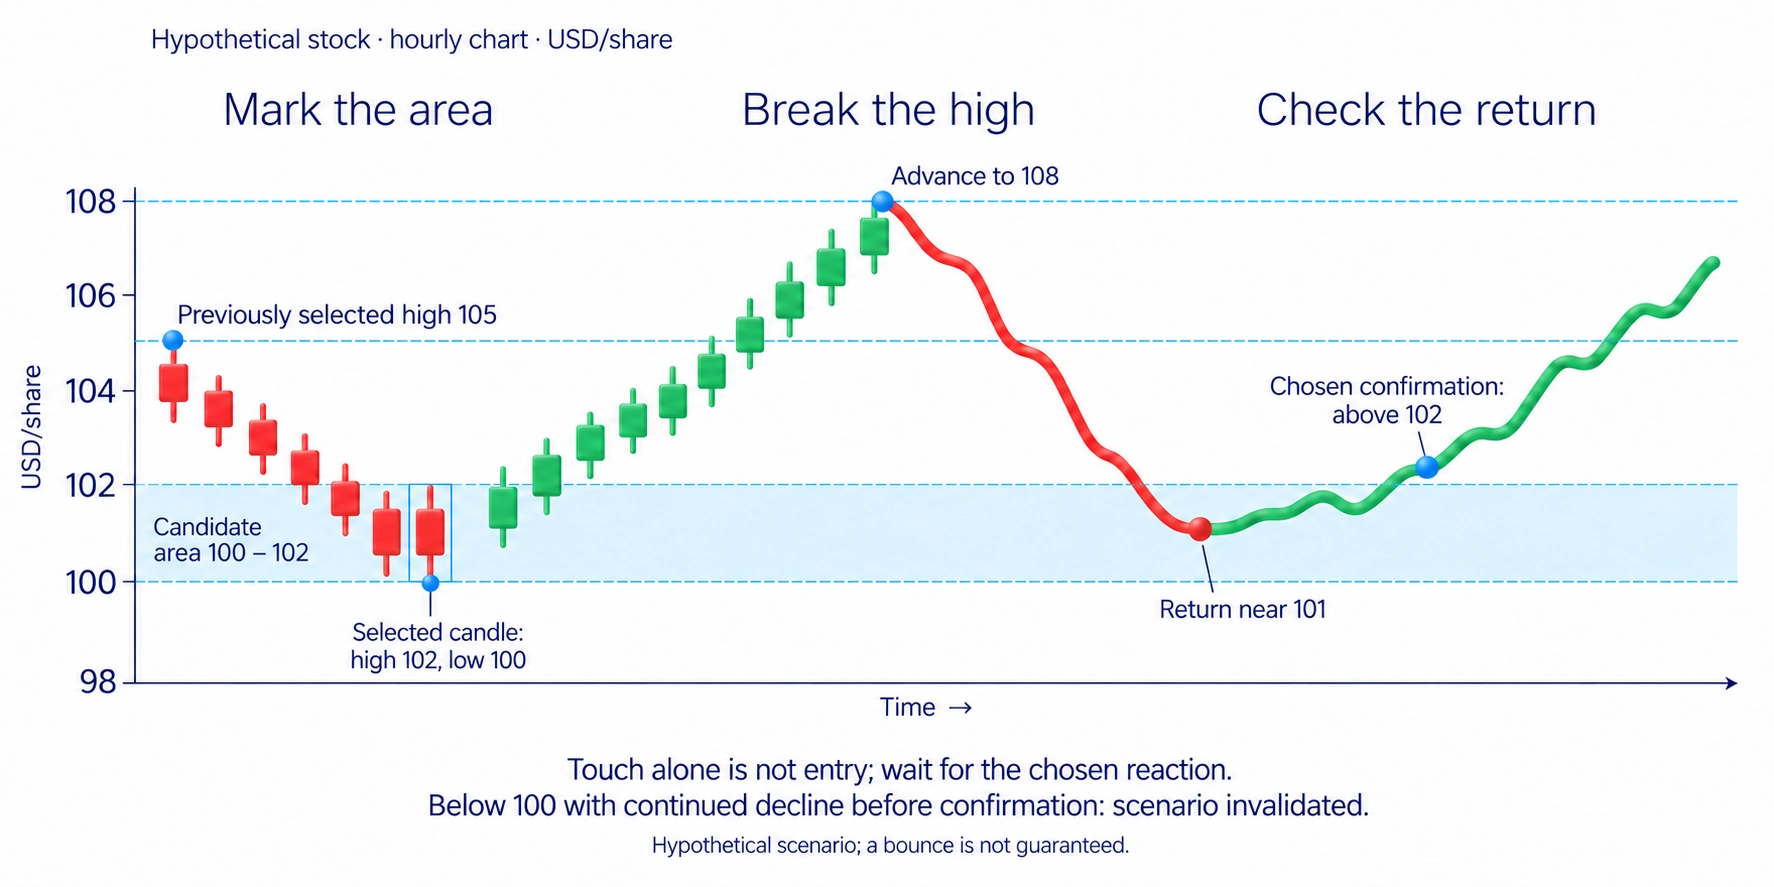
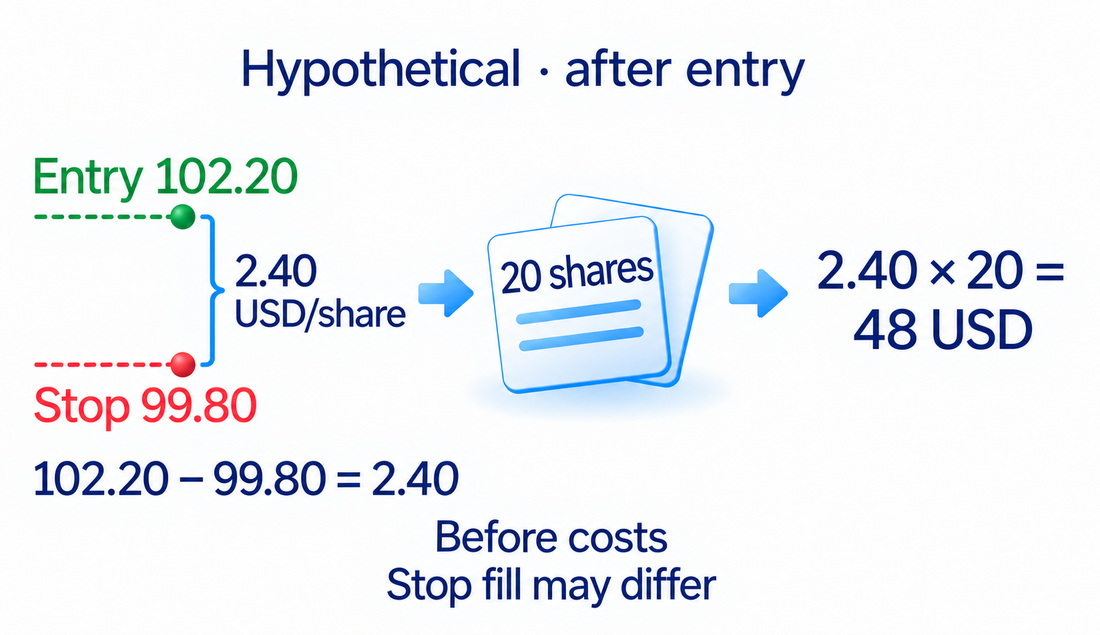
For the same example, assume a purchase at 102.20 and a protective stop at 99.80, below the lower boundary. The planned price distance is 2.40 dollars per share. Buying 20 shares gives a planned loss of 48 dollars before fees or other execution differences. A narrow block does not determine cash risk on its own; the quantity held also matters.
The earlier high at 108 is a possible objective for this particular scenario, not a price that must be reached. Check whether the nearest obstacle leaves enough room compared with the distance to the planned exit. If not, skip the trade rather than invent a distant target merely to make the apparent reward attractive.
If price passes below 100 and continues down before confirmation, the expected support has not appeared. If the planned exit is triggered after entry, record the result instead of stretching the block downward to keep the story alive. A stop does not guarantee a fill at 99.80, so the actual loss can differ from 48 dollars. The risk-management guide explains how to choose the quantity for a loss budget.
When an order block fails
For a bullish candidate, cancellation may involve a move through the lower boundary without the expected recovery. For a bearish one, assess the upper boundary. Fix the particular condition before trading, such as a close beyond the boundary on the chosen period. A brief excursion and sustained movement through the area are different observations.
A broken block is sometimes considered as a breaker block, an area assessed in the opposite role. In the same example, after a decline below 100, the area from 100 to 102 can be watched during a return from below as possible resistance. The new role requires its own reaction. A break does not automatically authorise an immediate opposite trade.
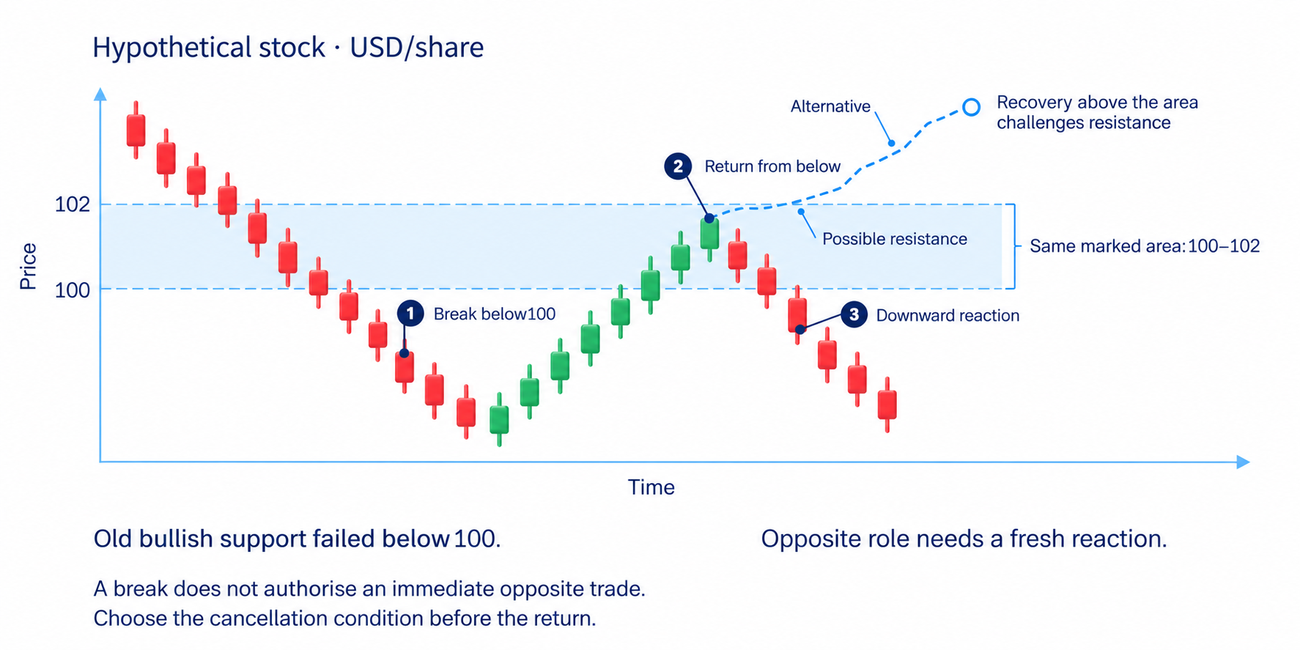
To test the marking rule, select the area and confirmation condition before the next candles appear. Keep returns without a response as well as successful cases. Watch for changing the base candle after each failure: that no longer tests the original rule. The block remains useful as a defined area of investigation when the decision follows observed price rather than a story about unknown orders.
Frequently asked questions
It is an area before a directional move, commonly marked from the last opposite-direction candle. On a return, check the price reaction. The marking convention does not prove that bank orders remain inside the area.
Find the last falling candle before a strong advance. Under this article's rule, the move must pass a high selected beforehand, and the area's boundaries are the candle's high and low, including its shadows.
Support is identified through meaningful price reactions. An order block is marked from the selected candle before a directional move. Both can cover an area, overlap and fail to produce the expected reaction; neither reveals orders merely because it has been drawn.
The block uses the chosen candle at the move's base. An FVG uses the non-overlap between the first and third candles of a particular sequence. They can overlap, but they are different constructions and do not guarantee a return.
Place the planned exit beyond the area whose breach would invalidate the selected scenario. In the buying example, the stop is below the block, and its distance is assessed together with the number of shares. The execution price and actual loss are not guaranteed.
Mitigation of an ordinary block describes a return to the area. A breaker is a broken block examined in an opposite role. The return does not confirm that all remaining orders were executed, and the new role requires a fresh price reaction.
About the author
Igor Arapov, practising trader since 2013 and author of the ArapovTrade library. ORCID: 0009-0003-0430-778X.